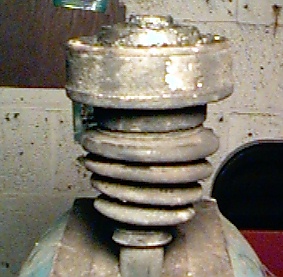
Step 1 - Removing the joints:
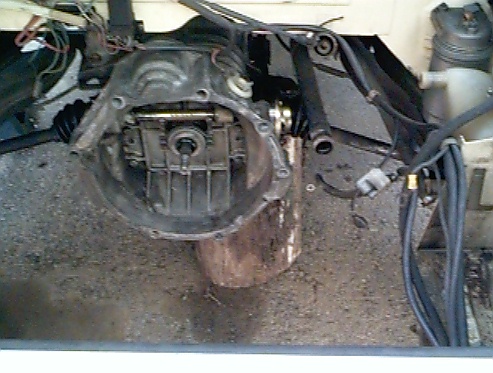
 To properly service the CV joints, they must be removed from the car. On VW Vanagons, they are bolted to a flange protruding from the transmission on one end, and to a similar flange on the back of the wheel hub on the other. The bolts (6 per joint) will either be a 6-point allen head or 12-point "triple-square" design cap head bolt.
Before attempting to remove the bolts, spend some time with a small pick and clean out the accumulated crud from the heads of the bolts. Failure to do so may result in you "stripping" out the head of the bolt, making it even more difficult to remove. Once clean, use a 6mm allen head wrench to remove the screws from the joints on each end of the shaft. The driveshaft, complete with the joints can now be removed. Once on the ground, I like to mark the joints for reference. I use metal stamps and a hammer, imprinting PI (Passenger Inner), PO (Passenger Outer), DI (Driver Inner) or DO (Driver Outer) on the joint. This aids re-assembly later.
Now that the joint is out, place the driveshaft in a vise, or use a C-clamp to secure it to your workbench. Note:Click on thumbnails for expanded images!
Step 2 - Removal of the joints from the driveshaft:
Once the shaft is securely held, the disassembly can begin.
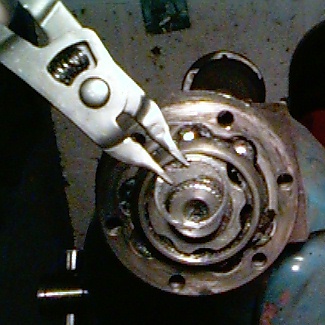 The second (recommended) method is to use a set of retaining ring pliers to remove the ring. These should cost no more than $10 or so from a parts house. Use the pliers to spread the ring, and slide it off the end of the shaft. The picture to the right shows the use of the pliers.
Refer to the previous 2 pictures, and notice the construction of the joint. There is a inner race on the splined shaft, a bearing cage to house and guide the ball bearings, and an outer race the balls ride in. To remove the joint, you may be able to simply slide the entire assembly off. Most times, a little persuasion is necessary. Do not, at any time, use a hammer on the splined shaft or the outer race! This can damage either the splines or housing, and ruin your shaft or joint. If the joint appears to be stuck on the shaft, slide the boot open from the back side. Use a long punch and a hammer against the inner race to drive the entire joint off.
Step 3 - Disassembly and cleaning of the CV Joint:
To properly clean the joint, disassembly is necessary.
Once completely apart, wipe off as much of the old grease as possible with a rag or paper towels. Thoroughly clean the joint in your choice of solvent. Right now, I am using diesel fuel, since I have a bunch left over from my Vanagon's tank. Kerosene works well, and I have also tried Simple Green.
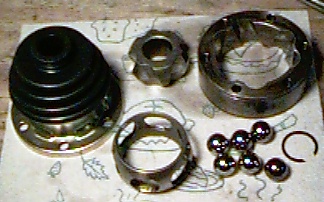 Be sure to remove all traces of the old grease in the process. You may even need to use a fine wire brush to get the stubborn deposits off. If you used a petroleum-based solvent, dip the parts in hot, soapy water to remove the residue (This is because that some grease formulas will break down when left in contact with solvent). Then rinse the parts under hot water. Immediately dry using compressed air or a clean cloth to prevent corrosion.Place the now clean parts on a clean surface. I like to place a paper towel over my workbench for this part.
Step 4 - Assembly of the CV Joint:
I like to assemble the joint "dry",
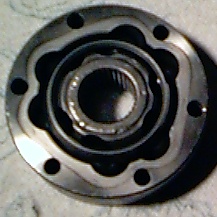 Here's the really important part - Notice how the grooves for the ball bearings in the outer race are not equally spaced. The inner race also has large and small spaces between the ball bearing grooves. To assemble the joint correctly, make sure to align the thin spaces of the inner race with the wide spaces of the outer race. Be careful - You can do this wrong! In fact, the joint goes together easier when you are doing it the wrong way. If you assemble it the wrong way, the joint will bind when it tries to flex.
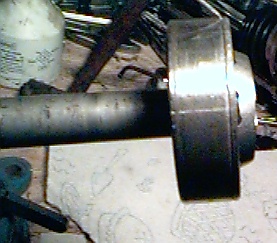 Now the joint is ready to be installed back on the splined shaft. If you are replacing the CV-Joint boots, slide those on first. You will want to push it down the shaft a ways, so you have easy access to the back of the joint. Slide the joint onto the shaft next, and secure it with the retaining ring. Notice the groove on the outside of the outer race - it is closest to the end of the shaft. Test the operation of the joint by swivelling the joint in various directions. You should not feel any binding of the joint.
 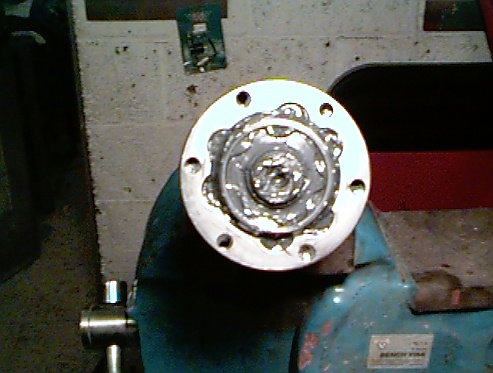 Just be sure not to tilt the joint too far, or the ball bearings may fall out! Once you are convinced the joint works properly, it's time to grease it. Start packing the grease in from the front, one finger-full at a time. Be sure to fill all the open areas, and keep pressing in more grease until it starts oozing out the back. The moly-based grease is really messy, so be sure to have plenty of paper towels around.
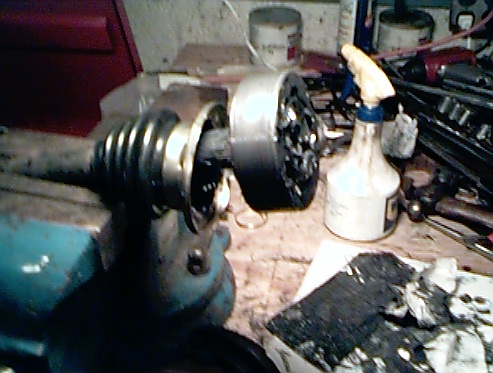 With the joint properly greased, slide the boot back down the shaft. When I have extra grease left over, I'll stuff some into the boot, and smear a layer on the face of the joint. Now repeat steps 2-4 for the joint on the other end of the shaft.
 Step 5 - Reinstalling the CV Joints:
Start by using brake cleaner to clean out the threads in the hubs on the transmission for the attaching bolts. Do the same for the end near the tire.
 Using the same solvent, clean all grease residue from the bolts. Apply Loctite to the threads, and use them to attach your freshly-serviced CV-joints. Use a torque wrench, and secure the bolts. Check your manual for the exact torque, but it should be about 35 Ft-lbs. Be sure to use the torque wrench! If you don't, you run the risk of the bolts working loose and eventually shearing off. If that happens, you will end up "Pushing a rope" (getting towed) back home.
Following the above steps will probably take you the better part of a day, so be sure to allocate the time needed. You should feel pretty good about yourself, as you have saved yourself a small pile of money and probably extended the life of your CV-Joints. Just be sure to take off your clothes before heading back inside...that moly-based grease is a real mess to clean up!
Home
Please stop back soon!
Tom Carrington