Vanagon to Golf 4-cyl gas conversions
By Rob Winterkorn
"Busbie 1" was my first Vanagon. It's a 1984 model I picked up from a local repair shop that inherited it from the
original owners. They took the engine, and I got the Van with the transmission stuck in 3rd gear.
The goal of this project was to put together reliable transportation for as little money as possible.
Beauty was not a factor. My conversion cost me well under $1000.00
including donor car and KEP kit. So please, go easy on me in the beauty department.
Note: Click on thumbnails for expanded images!
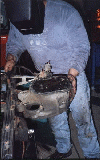
 The donor was a 1984 GTI with a little over 110,000 miles. I recommend that you try to get a complete
car for your project. I removed the engine with all the wiring harnesses hooked up, cutting the car
in some places to leave just a few ground and hot wires.
The donor was a 1984 GTI with a little over 110,000 miles. I recommend that you try to get a complete
car for your project. I removed the engine with all the wiring harnesses hooked up, cutting the car
in some places to leave just a few ground and hot wires.
My main motor mount was made from a 3"x2" channel with a Type 2 transmission hanger welded to it.
It went through 2 small 4" windows i cut on the left and right sides of the engine compartment.
I then used the 2 rear motor mounts from the original wasserboxer engine. I bent the "U" shaped
channel flat. The stud end went to the 3"x2" mounted to the frame rails. The only other mount used
for the engine was the timing belt side mount.
 Once the engine is in the van on this center mount, it can be easily moved around front to back and
left to right. I welded a plate to the back inside of the van just under the license plate window.
From that I had 2 removable "L" brackets. A look at my 1.6L Rabbit-powered Type 2 pic shows this.
Once the engine is in the van on this center mount, it can be easily moved around front to back and
left to right. I welded a plate to the back inside of the van just under the license plate window.
From that I had 2 removable "L" brackets. A look at my 1.6L Rabbit-powered Type 2 pic shows this.

 I went through several different manifolds setting up the exhaust. In my experience, the best to
date would be from the VW Fox. The Fox manifold give you an angle towards the front of the van which
allows room to make a nice sweep back to hook into the exhaust in the stock Vanagon location.
I went through several different manifolds setting up the exhaust. In my experience, the best to
date would be from the VW Fox. The Fox manifold give you an angle towards the front of the van which
allows room to make a nice sweep back to hook into the exhaust in the stock Vanagon location.

 I was amazed at the interest at my first show with the van. The most frequent comment was "Why didn't VW
do this in the first place?".
I was amazed at the interest at my first show with the van. The most frequent comment was "Why didn't VW
do this in the first place?".
 I have put close to 100,000 miles on this van since the conversion with no major problems. I get about
20-22 MPG and I have a top speed of just over 100MPH. I can even run at 80-90MPH while pulling my
camper!
I have put close to 100,000 miles on this van since the conversion with no major problems. I get about
20-22 MPG and I have a top speed of just over 100MPH. I can even run at 80-90MPH while pulling my
camper!

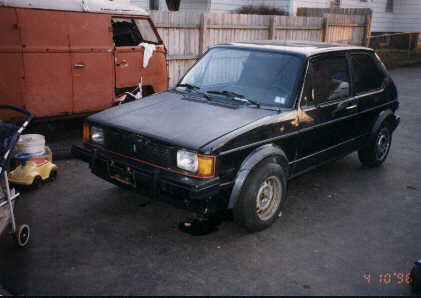
 "Busbie 2" is my 1985 7-seater. The engine is a 1.8L from an 1987 16v GTI. I know the talk
has been that this is not a good engine choice for the Vanagon. I must agree on two
areas: They are still a lot of money and the vibration is more evident. But I paid nothing
for my engine, so the price was right! I wouldn't trade the top end acceleration for anything!
My next project is a 2.0L 16v from a 1990 Passat going into my 1989 Wolfsburg.
"Busbie 2" is my 1985 7-seater. The engine is a 1.8L from an 1987 16v GTI. I know the talk
has been that this is not a good engine choice for the Vanagon. I must agree on two
areas: They are still a lot of money and the vibration is more evident. But I paid nothing
for my engine, so the price was right! I wouldn't trade the top end acceleration for anything!
My next project is a 2.0L 16v from a 1990 Passat going into my 1989 Wolfsburg.
 This is Busbie 4 - A 1989 Wolfsburg Vanagon and my fourth conversion. I drove this same bus back
in 1989 when I worked at a dealership that got it. I took it home for lunch to show my wife.
Back than we could only dream of owning it. Ten years later, in well used average
condition we picked it up for an $80.00 donation to a local VW club "The Hoosiers Volks"
in Indiana. The previous owner left it in gear while towing it behind a
motor home, and clipped a large landscaping rock, taking out the left rear quarter and bumper.
This is Busbie 4 - A 1989 Wolfsburg Vanagon and my fourth conversion. I drove this same bus back
in 1989 when I worked at a dealership that got it. I took it home for lunch to show my wife.
Back than we could only dream of owning it. Ten years later, in well used average
condition we picked it up for an $80.00 donation to a local VW club "The Hoosiers Volks"
in Indiana. The previous owner left it in gear while towing it behind a
motor home, and clipped a large landscaping rock, taking out the left rear quarter and bumper.
 My main motor mount is made from two 2 inch channels welded together, with one roughly 4 inches
longer on each end. Then I make 2 "U" shaped cradles from flat steel with two holes,
one side getsnuts welded to the outside. It attaches to the two ears on the top of the
transmission bell housing. The first conversion I did used one that I removed from a
72-79 type 2. This is where I got the idea from. This pic shows me tacking the U plate
to the channel with a spare bell housing bolted in place.
My main motor mount is made from two 2 inch channels welded together, with one roughly 4 inches
longer on each end. Then I make 2 "U" shaped cradles from flat steel with two holes,
one side getsnuts welded to the outside. It attaches to the two ears on the top of the
transmission bell housing. The first conversion I did used one that I removed from a
72-79 type 2. This is where I got the idea from. This pic shows me tacking the U plate
to the channel with a spare bell housing bolted in place.
 This pic shows the completed mount. It is held up from the two main channels that run front
to rear on the Vanagon. I cut two square windows in the sheet metal,
exposing the top of the channels to the engine compartment approximately 5 inches
back from the firewall.
This pic shows the completed mount. It is held up from the two main channels that run front
to rear on the Vanagon. I cut two square windows in the sheet metal,
exposing the top of the channels to the engine compartment approximately 5 inches
back from the firewall.
 This is the stock motor mount from the Vanagon. I cut one side of the
flat section off, flush. This gets bolted to the frame last after the
rear mount is installed. The stud end goes into the top, longer section on the channel.
This is the stock motor mount from the Vanagon. I cut one side of the
flat section off, flush. This gets bolted to the frame last after the
rear mount is installed. The stud end goes into the top, longer section on the channel.

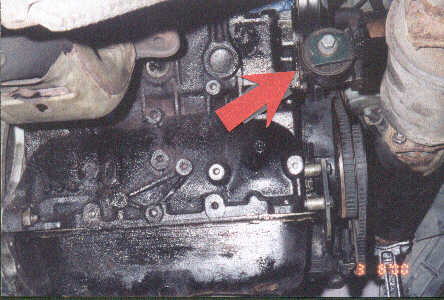
 The only other mount I use is from an early A1 (rabbit, jetta)
This mount bolts just under the head into the block on the timing belt
side. An "L" shaped plate is welded under the license plate window on the inside the
engine compartment to distribute the stress. This plate is 12-14 inches long.
From this point to the engine motor mount is about 7-9 inches.
I have two 3 inch sections of channel welded together, and two "L"
brackets welded to them to make up the difference.
The nice thing about this set up is this section is bolted to the
channel on the van and the other end is bolted into the mount, can be
completely removed for future engine removal.
The only other mount I use is from an early A1 (rabbit, jetta)
This mount bolts just under the head into the block on the timing belt
side. An "L" shaped plate is welded under the license plate window on the inside the
engine compartment to distribute the stress. This plate is 12-14 inches long.
From this point to the engine motor mount is about 7-9 inches.
I have two 3 inch sections of channel welded together, and two "L"
brackets welded to them to make up the difference.
The nice thing about this set up is this section is bolted to the
channel on the van and the other end is bolted into the mount, can be
completely removed for future engine removal.

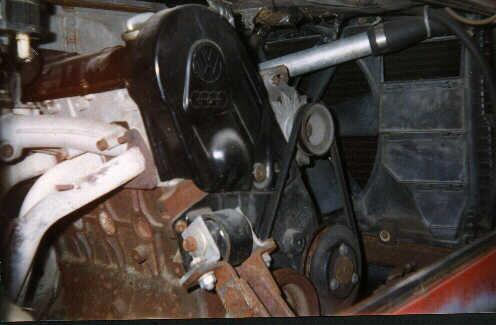
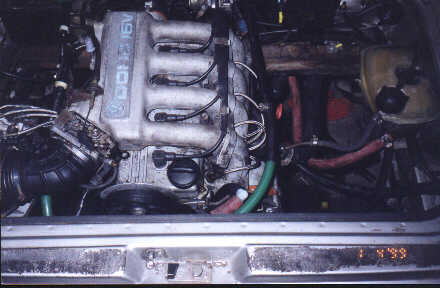
 Here's a couple of photos of the completed installation of the 2.0L, 16 valve powerplant.
Rob Winterkorn

Back to Engine Conversions
Home
Please stop back soon!
Tom Carrington
 Once the engine is in the van on this center mount, it can be easily moved around front to back and
left to right. I welded a plate to the back inside of the van just under the license plate window.
From that I had 2 removable "L" brackets. A look at my 1.6L Rabbit-powered Type 2 pic shows this.
Once the engine is in the van on this center mount, it can be easily moved around front to back and
left to right. I welded a plate to the back inside of the van just under the license plate window.
From that I had 2 removable "L" brackets. A look at my 1.6L Rabbit-powered Type 2 pic shows this.
 I went through several different manifolds setting up the exhaust. In my experience, the best to
date would be from the VW Fox. The Fox manifold give you an angle towards the front of the van which
allows room to make a nice sweep back to hook into the exhaust in the stock Vanagon location.
I went through several different manifolds setting up the exhaust. In my experience, the best to
date would be from the VW Fox. The Fox manifold give you an angle towards the front of the van which
allows room to make a nice sweep back to hook into the exhaust in the stock Vanagon location.
 I was amazed at the interest at my first show with the van. The most frequent comment was "Why didn't VW
do this in the first place?".
I was amazed at the interest at my first show with the van. The most frequent comment was "Why didn't VW
do this in the first place?".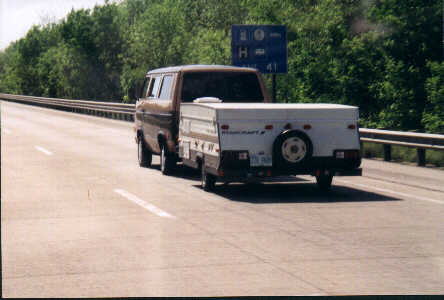 I have put close to 100,000 miles on this van since the conversion with no major problems. I get about
20-22 MPG and I have a top speed of just over 100MPH. I can even run at 80-90MPH while pulling my
camper!
I have put close to 100,000 miles on this van since the conversion with no major problems. I get about
20-22 MPG and I have a top speed of just over 100MPH. I can even run at 80-90MPH while pulling my
camper!
 "Busbie 2" is my 1985 7-seater. The engine is a 1.8L from an 1987 16v GTI. I know the talk
has been that this is not a good engine choice for the Vanagon. I must agree on two
areas: They are still a lot of money and the vibration is more evident. But I paid nothing
for my engine, so the price was right! I wouldn't trade the top end acceleration for anything!
My next project is a 2.0L 16v from a 1990 Passat going into my 1989 Wolfsburg.
"Busbie 2" is my 1985 7-seater. The engine is a 1.8L from an 1987 16v GTI. I know the talk
has been that this is not a good engine choice for the Vanagon. I must agree on two
areas: They are still a lot of money and the vibration is more evident. But I paid nothing
for my engine, so the price was right! I wouldn't trade the top end acceleration for anything!
My next project is a 2.0L 16v from a 1990 Passat going into my 1989 Wolfsburg.
 This is Busbie 4 - A 1989 Wolfsburg Vanagon and my fourth conversion. I drove this same bus back
in 1989 when I worked at a dealership that got it. I took it home for lunch to show my wife.
Back than we could only dream of owning it. Ten years later, in well used average
condition we picked it up for an $80.00 donation to a local VW club "The Hoosiers Volks"
in Indiana. The previous owner left it in gear while towing it behind a
motor home, and clipped a large landscaping rock, taking out the left rear quarter and bumper.
This is Busbie 4 - A 1989 Wolfsburg Vanagon and my fourth conversion. I drove this same bus back
in 1989 when I worked at a dealership that got it. I took it home for lunch to show my wife.
Back than we could only dream of owning it. Ten years later, in well used average
condition we picked it up for an $80.00 donation to a local VW club "The Hoosiers Volks"
in Indiana. The previous owner left it in gear while towing it behind a
motor home, and clipped a large landscaping rock, taking out the left rear quarter and bumper. My main motor mount is made from two 2 inch channels welded together, with one roughly 4 inches
longer on each end. Then I make 2 "U" shaped cradles from flat steel with two holes,
one side getsnuts welded to the outside. It attaches to the two ears on the top of the
transmission bell housing. The first conversion I did used one that I removed from a
72-79 type 2. This is where I got the idea from. This pic shows me tacking the U plate
to the channel with a spare bell housing bolted in place.
My main motor mount is made from two 2 inch channels welded together, with one roughly 4 inches
longer on each end. Then I make 2 "U" shaped cradles from flat steel with two holes,
one side getsnuts welded to the outside. It attaches to the two ears on the top of the
transmission bell housing. The first conversion I did used one that I removed from a
72-79 type 2. This is where I got the idea from. This pic shows me tacking the U plate
to the channel with a spare bell housing bolted in place.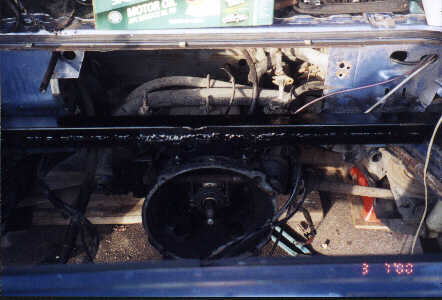 This pic shows the completed mount. It is held up from the two main channels that run front
to rear on the Vanagon. I cut two square windows in the sheet metal,
exposing the top of the channels to the engine compartment approximately 5 inches
back from the firewall.
This pic shows the completed mount. It is held up from the two main channels that run front
to rear on the Vanagon. I cut two square windows in the sheet metal,
exposing the top of the channels to the engine compartment approximately 5 inches
back from the firewall.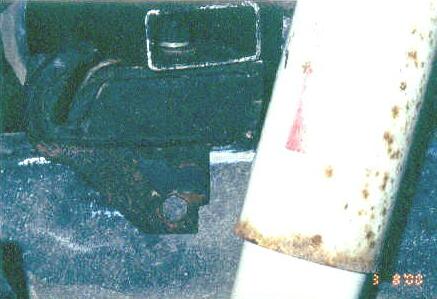 This is the stock motor mount from the Vanagon. I cut one side of the
flat section off, flush. This gets bolted to the frame last after the
rear mount is installed. The stud end goes into the top, longer section on the channel.
This is the stock motor mount from the Vanagon. I cut one side of the
flat section off, flush. This gets bolted to the frame last after the
rear mount is installed. The stud end goes into the top, longer section on the channel.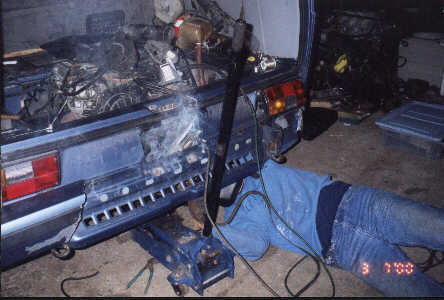
 The only other mount I use is from an early A1 (rabbit, jetta)
This mount bolts just under the head into the block on the timing belt
side. An "L" shaped plate is welded under the license plate window on the inside the
engine compartment to distribute the stress. This plate is 12-14 inches long.
From this point to the engine motor mount is about 7-9 inches.
I have two 3 inch sections of channel welded together, and two "L"
brackets welded to them to make up the difference.
The nice thing about this set up is this section is bolted to the
channel on the van and the other end is bolted into the mount, can be
completely removed for future engine removal.
The only other mount I use is from an early A1 (rabbit, jetta)
This mount bolts just under the head into the block on the timing belt
side. An "L" shaped plate is welded under the license plate window on the inside the
engine compartment to distribute the stress. This plate is 12-14 inches long.
From this point to the engine motor mount is about 7-9 inches.
I have two 3 inch sections of channel welded together, and two "L"
brackets welded to them to make up the difference.
The nice thing about this set up is this section is bolted to the
channel on the van and the other end is bolted into the mount, can be
completely removed for future engine removal.
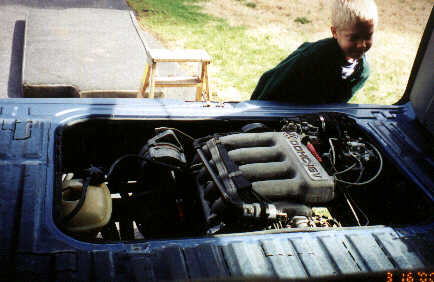 Here's a couple of photos of the completed installation of the 2.0L, 16 valve powerplant.