The project continues!
March, 1998: I have received many E-mails wondering about my conversion project, most asking how the van drives, etc. Others have badgered me for not updating the web pages. Mea culpa! The truth is, I haven't worked on the Vanagon more than 30 hours or so since November of 1996 due to demands at work. I will be working less hours this spring, so progress on the conversion will commence once again! Let's start by looking at what has been accomplished during the past 16 months or so...
An issue with the engine conversion is the low gearing of the diesel transmission. The stock diesel engine output is 48 HP versus the 67 HP of the air-cooled gas engine offered the same year. To compensate, the diesel transmission has lower gear ratios than the gasoline transmission. At highway speeds with the diesel transmission, the engine rpm is quite high. To allow the engine to turn a little slower, I modified the gas-powered Vanagon transmission by installing the bell housing and input shaft from the diesel trans. The process is not too difficult, with only a few special tools needed. I tackled this part of the job during the Memorial Day weekend in 1997.
 Start by draining the transmission. With the transmission on a workbench, simply unbolt the bellhousing from the transmission. The bellhousing will now slide off the transmission. The input shaft is secured with a small circlip retaining ring. Remove the ring, slide the splined collar/coupling out an inch or so, and unscrew the input shaft. After removal of the input shaft, the tranny will look something like what you see on the left.
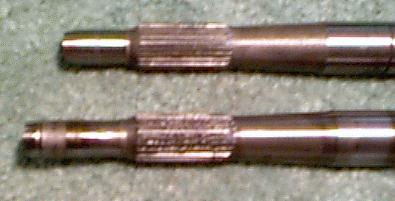
 These next 2 photos show the difference between the diesel and the gasoline transmission input shafts. The real difference is that the gasoline shaft
  is a little longer than the diesel shaft. They are both the same diameter on the end, so it would stand to reason that if you could not find a diesel shaft, the gasoline version could be shortened by a competent machinist. The picture on the right shows the shafts with their collars/coupling. The picture on the left is a close-up of the end of the shaft that will ride in the engine's pilot bearing.
 After swapping the input shafts, I installed a new seal for the input shaft in the diesel bellhousing, and installed it on the gas transmission with a new gasket. After refilling the transmission with oil, I went ahead and re-installed it in the Vanagon. I had removed the engine and transmission as a single unit, but I decided to install them separately. The idea was that I would be able to move the engine around easier while installing without the extra bulk of the tranny. With the engine out of the van, it was an easy job to get my freshly repacked CV joints and axles installed as well.
I also did some work on the engine during the Memorial Day weekend. The stock fuel injection from the Golf uses an oxygen sensor to control the fuel mixture. Since there was no fitting on the diesel exhaust, I modified it to accept a sensor.  I went to the local Pep-Boys store, and purchased an universal oxygen sensor. The threads were the same as a spark plug (18mm), so I trimmed one of those spark plug "no-foul" adapter sleeves down to a threaded flange. I then drilled a hole in the exhaust pipe in a location that would be easy to access from under the van. I used brass to braze the fitting to the exhaust pipe. I tried welding it first, but the heat from the torch kept ruining the threads of the fitting.
The July 4th weekend of 1997 was the next chance I got to work on the Van. With the transmission installed, it was time to finish preparing the engine. I installed a new rear main oil seal on the gas engine, and bolted on the diesel flywheel.  It was then that I learned that the Golf does not use a pilot bearing in the crankshaft! Off to the parts store to buy a bearing. After locating and installing a pilot bearing, I was ready to install the engine. First, I used the engine hoist to remove the engine from the stand and lower it onto a piece of carpet on the ground. By tugging on the carpet, I was able to slide it under the rear of the van. Then I used the engine hoist to raise the engine up into the compartment.
Raising the engine and mating it to the transmission was a relatively simple task. I loosely installed two of the engine mounting bolts. Once the engine and trans were coupled together, I removed the bolts in the front transmission mount to allow me more "play" to move the engine around. As I raised the engine in place, it became apparent that I would definitely have clearance the engine compartment to make the engine fit. On the driver's side of the van, the intake manifold would not clear the frame rail and the sheetmetal of the compartment. I tried using a 20lb sledgehammer to whack the metal out of the way, but the hammer had no effect. Out came the whiz-wheel (muffler cutoff tool) and the air chisel. I wanted to remove as little metal as necessary, so I would trim a little, then test fit the engine. I repeated this process several times until the intake manifold fit. To the left, you can see the minimum amount that had to be removed to install the engine. Some of the trimming was in the sheetmetal surrounding the engine, and some was actually in the frame member. Whenever I have the engine out again, I will weld gussets into the cuts in the frame.
I had a real tough time getting the engine in it's mounts and the front transmission mount lined up at the same time. It turns out that the two different transmissions each have a different front mount. When I installed the diesel transmission mount on the gas trans, the mount would not line up with the bolt holes in the chassis. When I used the gas transmission mount, the bolt holes would line up, but the transmission was too high under the van and would not fit. You can see the difference in the mounts by looking at the photo to the right. In the photo, the diesel mount is on the left, and the taller mount to the right is for the gas engine. What I surmise from my hour or so of fighting to install the transmission is that the diesel transmission is slightly longer and mounted lower than the gas engine by about and inch or so. I solved the problem by drilling three new mounting holes lower on the gas transmission mount, and chopping off the top of it where it was hitting the body. After the modification to the gas transmission mount, the transmission fit just fine.
That's about all that has been done to the van for now. The engine and transmission are installed, and ready for the next phase of the project, which is the installation of the fuel injection, ignition and wiring. In the photo to the left, you can see the installed gas engine. If you look closely at the full-size photo, you can see the area of the engine compartment that was cut to accomodate the intake manifold. I spent the Labor day weekend in 1997 removing all of the fuel and ignition system components from the donor 1986 Golf. This includes the wiring harness from under the dash, as well as the fuel pump assembly from under the car. Sometime in April or May 1998, I will start installing these components. Last September, another important milestone was achieved: The rear tires on the Vanagon touched terra firma once again. After nearly a year on the jackstands, the van was back down on all fours!
Page 3 of the Vanagon diesel to Golf/Jetta 4-cyl gas engine conversion
Back to Page 1 of the Vanagon diesel to Golf/Jetta 4-cyl conversion

Back to Engine Conversions
Home
Please stop back soon!
Tom Carrington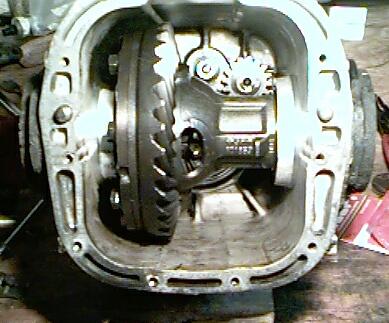
 is a little longer than the diesel shaft. They are both the same diameter on the end, so it would stand to reason that if you could not find a diesel shaft, the gasoline version could be shortened by a competent machinist. The picture on the right shows the shafts with their collars/coupling. The picture on the left is a close-up of the end of the shaft that will ride in the engine's pilot bearing.
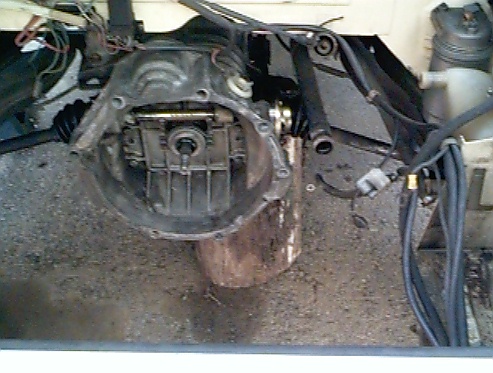 After swapping the input shafts, I installed a new seal for the input shaft in the diesel bellhousing, and installed it on the gas transmission with a new gasket. After refilling the transmission with oil, I went ahead and re-installed it in the Vanagon. I had removed the engine and transmission as a single unit, but I decided to install them separately. The idea was that I would be able to move the engine around easier while installing without the extra bulk of the tranny. With the engine out of the van, it was an easy job to get my freshly repacked CV joints and axles installed as well.
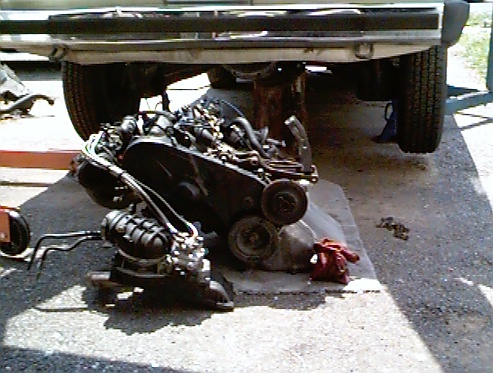 It was then that I learned that the Golf does not use a pilot bearing in the crankshaft! Off to the parts store to buy a bearing. After locating and installing a pilot bearing, I was ready to install the engine. First, I used the engine hoist to remove the engine from the stand and lower it onto a piece of carpet on the ground. By tugging on the carpet, I was able to slide it under the rear of the van. Then I used the engine hoist to raise the engine up into the compartment.
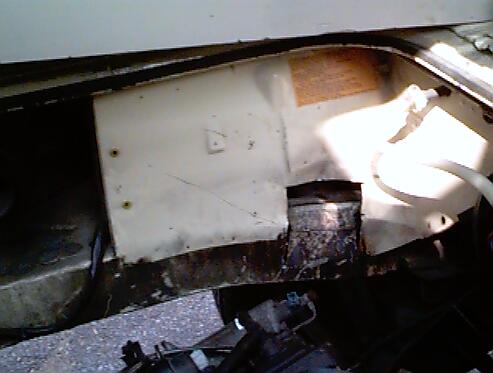 I tried using a 20lb sledgehammer to whack the metal out of the way, but the hammer had no effect. Out came the whiz-wheel (muffler cutoff tool) and the air chisel. I wanted to remove as little metal as necessary, so I would trim a little, then test fit the engine. I repeated this process several times until the intake manifold fit. To the left, you can see the minimum amount that had to be removed to install the engine. Some of the trimming was in the sheetmetal surrounding the engine, and some was actually in the frame member. Whenever I have the engine out again, I will weld gussets into the cuts in the frame.
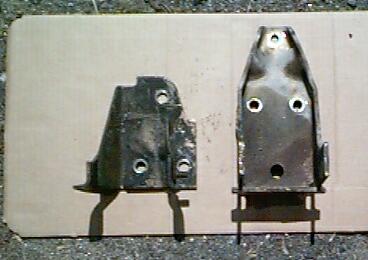 When I used the gas transmission mount, the bolt holes would line up, but the transmission was too high under the van and would not fit. You can see the difference in the mounts by looking at the photo to the right. In the photo, the diesel mount is on the left, and the taller mount to the right is for the gas engine. What I surmise from my hour or so of fighting to install the transmission is that the diesel transmission is slightly longer and mounted lower than the gas engine by about and inch or so. I solved the problem by drilling three new mounting holes lower on the gas transmission mount, and chopping off the top of it where it was hitting the body. After the modification to the gas transmission mount, the transmission fit just fine.
 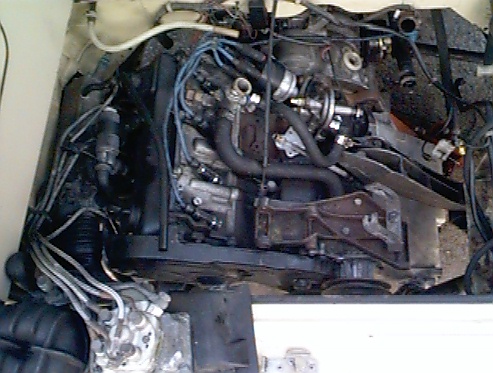 In the photo to the left, you can see the installed gas engine. If you look closely at the full-size photo, you can see the area of the engine compartment that was cut to accomodate the intake manifold. I spent the Labor day weekend in 1997 removing all of the fuel and ignition system components from the donor 1986 Golf. This includes the wiring harness from under the dash, as well as the fuel pump assembly from under the car. Sometime in April or May 1998, I will start installing these components. Last September, another important milestone was achieved: The rear tires on the Vanagon touched terra firma once again. After nearly a year on the jackstands, the van was back down on all fours!